Service / Endpoint


Opena) Questions
- Why is the service DNS not reachable after creating service?? curl nginx.default.svc.cluster.local
Useful Links
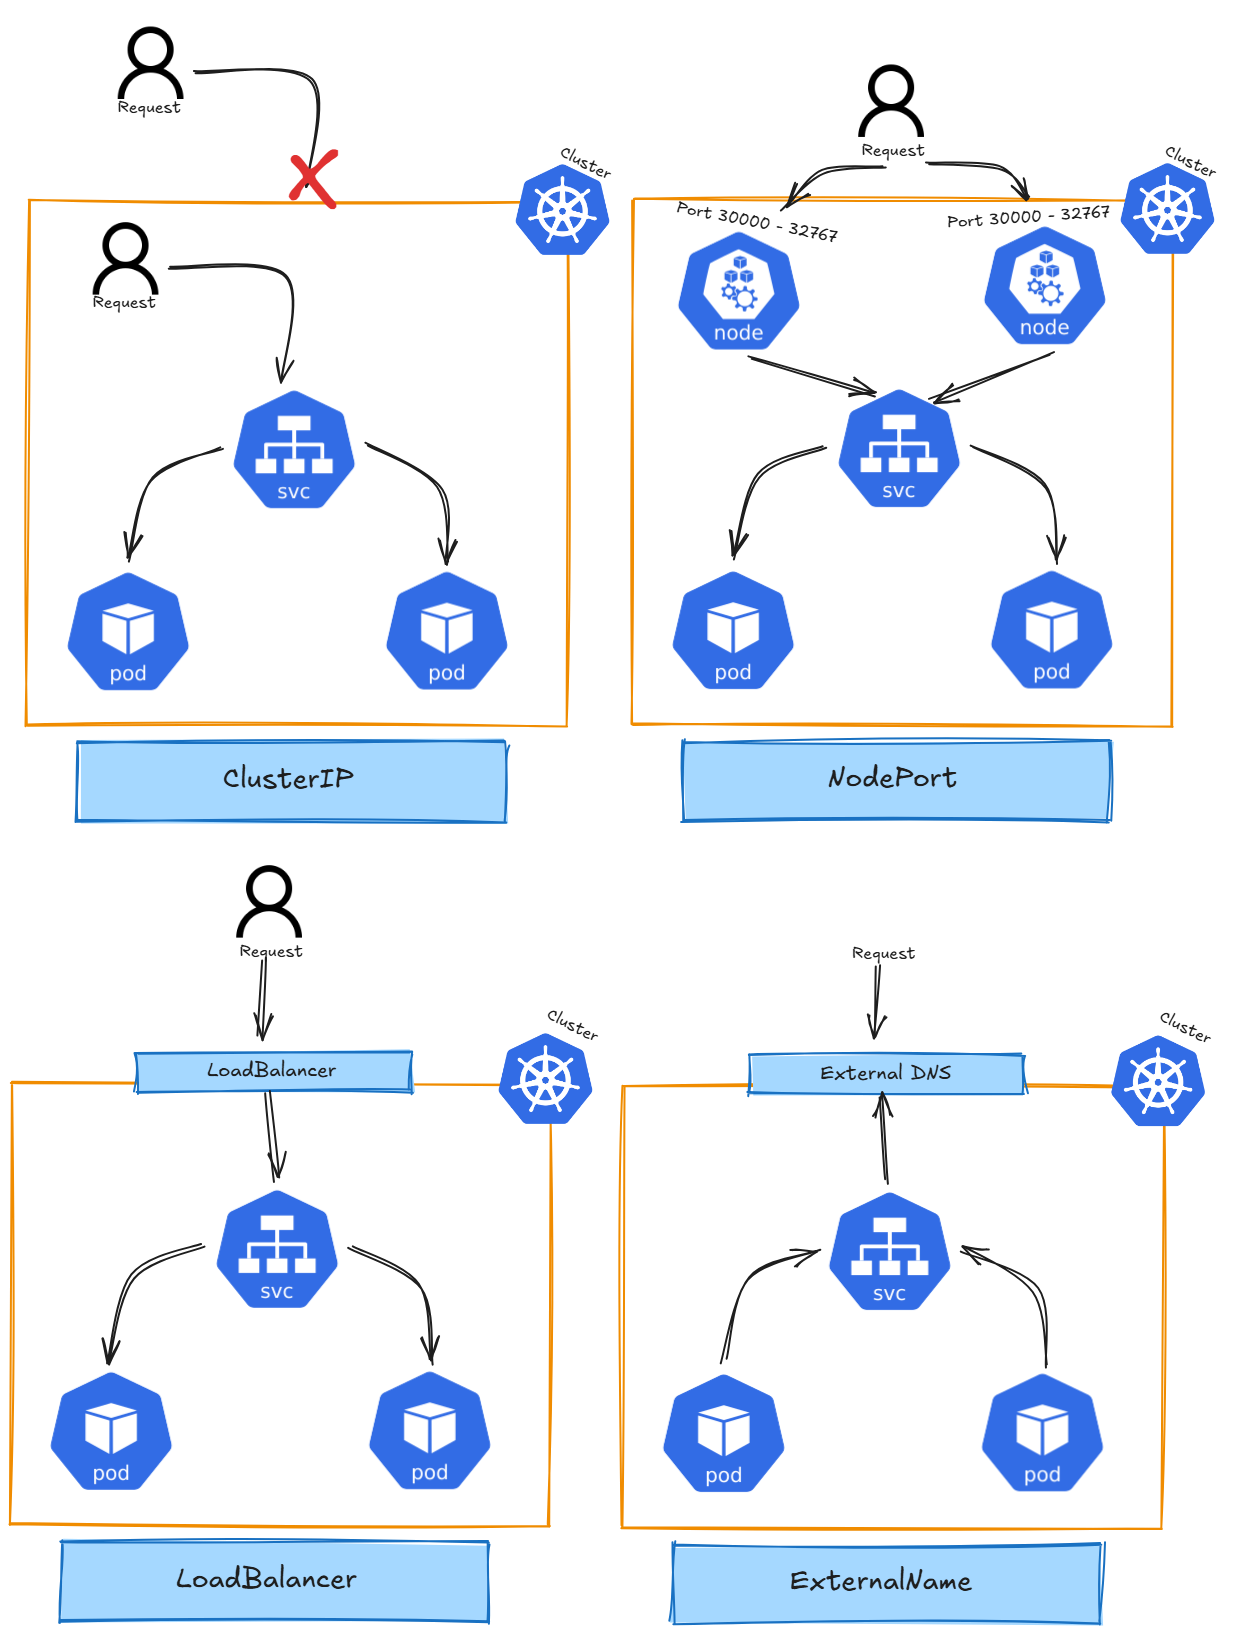
Architecture
Detailed Description
In Kubernetes, a Service is a way to expose an application running inside a set of Pods as a network service. It provides a stable IP address and DNS name, allowing access either from outside the cluster or from other Pods within the cluster. A Service serves as an abstraction layer, connecting clients to the appropriate Pods, ensuring that the actual Pods behind the Service can change without disrupting access.
There are different types of Services in Kubernetes, including:
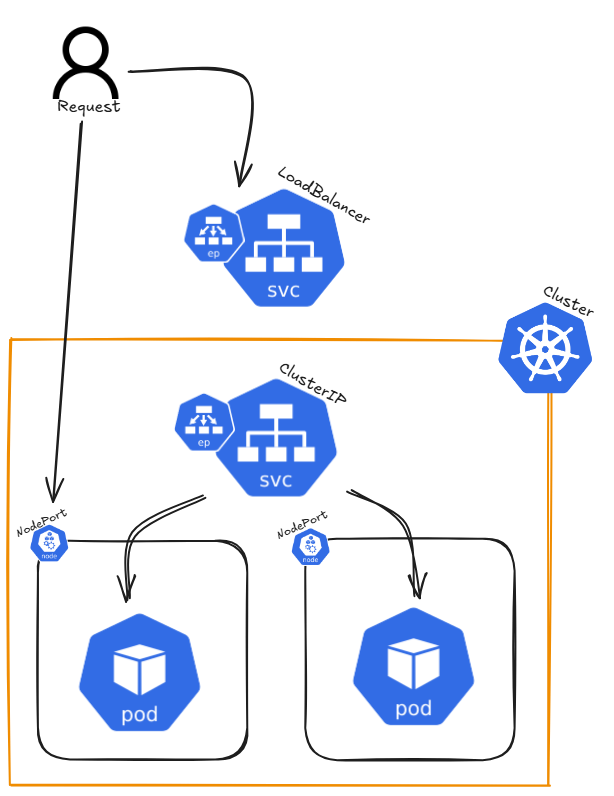
- ClusterIP: The default service type that assigns an internal IP, reachable only within the cluster. It allows communication between Pods inside the cluster. Kube-Proxy load balances traffic across pods behind a ClusterIP Service.
- NodePort: Exposes the service on a static port across all nodes in the cluster, allowing external traffic to access the service.
- LoadBalancer: In cloud environments, this service type provisions an external load balancer to distribute traffic to multiple Pods.
- ExternalName: Maps a service to an external DNS name, allowing Kubernetes services to refer to external resources.
- Headless Service: A type of ClusterIP service with no assigned IP. It allows direct access to Pods without a proxy.
Endpoints are associated with a Service and represent the IP addresses of the Pods that match the Service's selector. When a Service is created, Kubernetes automatically creates Endpoints for it, enabling traffic forwarding to the correct Pods.
Command Reference Guide
Cluster IP
# Create nginx deployment with three replicas
kubectl create deployment nginx --image=nginxdemos/hello --port=80 --replicas=3

# Expose application as ClusterIP with port 8080 (ClusterIP is the default if not defined)
kubectl expose deployment nginx --type=ClusterIP --port=8080 --target-port=80
# --port=8080: The port exposed by the service (used internally to access the deployment)
# --target-port=80: The port on the pods where the application is running

# Get services
kubectl get service nginx -o wide

# Get full resource description using describe
kubectl describe service/nginx

# Get created endpoints
kubectl get endpoints

# curl by default service DNS entry
# Each curl request gets a different hostname due to Kubernetes' Kube-Proxy load balancing
curl nginx.default.svc.cluster.local

# Delete service
kubectl delete service/nginx
NodePort:
# Create nginx deployment with three replicas
kubectl create deployment nginx --image=nginxdemos/hello --port=80 --replicas=3

# Expose application as NodePort
kubectl expose deployment/nginx --type=NodePort

# Get services
kubectl get service nginx -o wide
# first Port = application;second Port = NodePort

# Get full resource description using describe
kubectl describe service/nginx

# Delete service
kubectl delete service/nginx
LoadBalancer
# Create nginx deployment with three replicas
kubectl create deployment nginx --image=nginxdemos/hello --port=80 --replicas=3

# Expose application as LoadBalancer
kubectl expose deployment/nginx --type=LoadBalancer --port 8080 --target-port 80

# Get services
kubectl get service nginx -o wide
# first Port = application;second Port = NodePort

# Get full resource description using describe
kubectl describe service/nginx

# Delete service
kubectl delete service/nginx
ExternalName
# Query running pods
kubectl get pods

# Query detailed informatoin about pods
kubectl get pods -o wide

# Create single pod
kubectl run nginx --image=nginx

# Run image / pass environment and command
kubectl run --image=ubuntu ubuntu --env="KEY=VALUE" -- sleep infinity

# Get yaml configuration for the resource
kubectl run nginx --image=nginx --dry-run=client -o yaml | tee nginx.yaml

# Get specific information of any yaml section
kubectl explain pod.spec.restartPolicy

# Create pod resource from yaml configuration file
kubectl create -f nginx.yaml

# Apply pod resource from yaml configuration
kubectl apply -f nginx.yaml

# Delete pod resource wihtout waiting for graceful shutdown of application (--now)
kubectl delete pod/nginx pod/ubuntu --now

# Get full resource description using descripe
kubectl describe pod/nginx

# Get logs for a specific container in the pod
kubectl logs pod/nginx -c nginx

# If a pod fails use -p to get previouse logs for a specific container in the pod
kubectl logs pod/nginx -c nginx -p

# Combine pod creation
kubectl run nginx --image=nginx --dry-run=client -o yaml | tee nginx.yaml
kubectl run ubuntu --image=ubuntu --dry-run=client -o yaml | tee ubuntu.yaml
{ cat nginx.yaml; echo "---"; cat ubuntu.yaml; } | tee multi_pods.yaml
kubectl apply -f multi_pods.yaml
Headless Service
# Query running pods
kubectl get pods

# Query detailed informatoin about pods
kubectl get pods -o wide

# Create single pod
kubectl run nginx --image=nginx

# Run image / pass environment and command
kubectl run --image=ubuntu ubuntu --env="KEY=VALUE" -- sleep infinity

# Get yaml configuration for the resource
kubectl run nginx --image=nginx --dry-run=client -o yaml | tee nginx.yaml

# Get specific information of any yaml section
kubectl explain pod.spec.restartPolicy

# Create pod resource from yaml configuration file
kubectl create -f nginx.yaml

# Apply pod resource from yaml configuration
kubectl apply -f nginx.yaml

# Delete pod resource wihtout waiting for graceful shutdown of application (--now)
kubectl delete pod/nginx pod/ubuntu --now

# Get full resource description using descripe
kubectl describe pod/nginx

# Get logs for a specific container in the pod
kubectl logs pod/nginx -c nginx

# If a pod fails use -p to get previouse logs for a specific container in the pod
kubectl logs pod/nginx -c nginx -p

# Combine pod creation
kubectl run nginx --image=nginx --dry-run=client -o yaml | tee nginx.yaml
kubectl run ubuntu --image=ubuntu --dry-run=client -o yaml | tee ubuntu.yaml
{ cat nginx.yaml; echo "---"; cat ubuntu.yaml; } | tee multi_pods.yaml
kubectl apply -f multi_pods.yaml
Hints
When accessing an external IP (e.g., Node1's external IP), the hostname and IP displayed on the website may not change. To test Kubernetes' load-balancing behavior, cordon Node1 and delete the pod running on it. When you call Node1's IP again, kube-proxy will reroute the traffic to a healthy pod on another node.